To console ourselves after Englands World Cup dire effort, we thought we would take a break from developing our Loopy boards and decided to have a play with OpenCV.
We have a few Raspberry Pi knocking around the office and Chris just happened to have an Xbox 360 Chat cam in his laptop bag and this is the result…..
We decided to see if the Pi had enough oomph to implement rudimentary Goal Line technology. Now I don’t think FIFA will be knocking on the door anytime soon but we did sort of get something working.
The Hardware
Using what we had lying around the office, an Xbox 360 chat cam and a plastic goal from the local tat shop we built a stadium to rival Wembley…
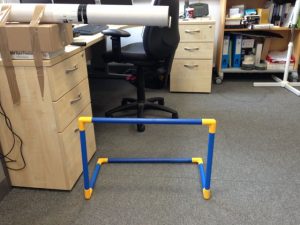
The stadium – Our £2.50 goal
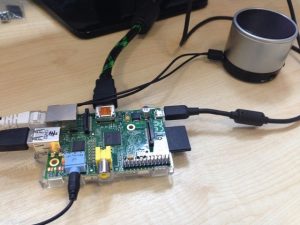
The brains – One of our many RaspberryPi

The eyes – A Microsoft Xbox 360 Chat Cam
The Software
Once we had the hardware cobbled together we needed some software.
The software needs to grab the live stream from the USB Camera and detect when the ball fully crosses the goal line. To speed things up we made use of the excellent OpenCV library, which on a fresh Raspian image is just a simple apt-get away:
sudo apt-get install opencv-*
Since we were using a fresh Raspian Image we also need to get build essential:
sudo apt-get install build-essential
Now we have the compiler and the OpenCV library lets grab an image from the Webcam to see what we can see:
[code lang=”c” title=”grab.cpp” collapse=”true”] #include <iostream>#include “opencv2/highgui/highgui.hpp”
#include “opencv2/imgproc/imgproc.hpp”
using namespace cv;
using namespace std;
int main( int argc, char** argv )
{
VideoCapture cap(0); //capture the video from web cam
if ( !cap.isOpened() ) // if not success, exit program
{
cout << “Cannot open the web cam” << endl;
return -1;
}
// Set the capture size to 320×240
cap.set(3,320);
cap.set(4,240);
Mat imgOriginal; // The matrix for the image to be stored
while (true)
{
bool bSuccess = cap.read(imgOriginal); // read a new frame from video
if (!bSuccess) //if not success, break loop
{
cout << “Cannot read a frame from video stream” << endl;
break;
}
imshow(“Grab”, imgOriginal); // Show the image in a window
if (waitKey(25) == 27) //wait for ‘esc’ key press for 25ms. If ‘esc’ key is pressed, break loop
{
cout << “esc key is pressed by user” << endl;
break;
}
}
return 0;
}
[/code]
Using the above source code and saved as grab.cpp we can compile and link against OpenCV using the following command line:
g++ grab.cpp -O2 -lopencv_core -lopencv_highgui -lopencv_imgproc -o grab
Assuming it compiles with no errors we can run up the new binary and see what the camera can see:
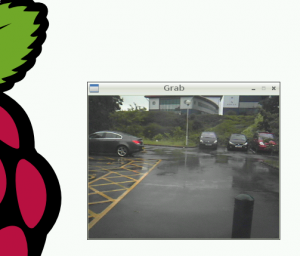
Screen Grab – The office car park never looked so good
Pointing the webcam outside we can see the office car park, note: you may get a different picture! Lets get on with trying to detect a football.
Ball Detection
Since we are dealing with a cheap webcam and a resource limited Pi we made use of a simple circle detection algorithm and used this to track a ball in the field of view. This shows up as a red circle around any detected circles and a green trace on the video output:
Circle detection is taken care of using “The Hough gradient method” which is handily implemented by OpenCV with the HoughCircles function call:
[code]void HoughCircles(InputArray image, OutputArray circles, int method, double dp, double minDist, double param1=100, double param2=100, int minRadius=0, int maxRadius=0 )[/code]Calling this gives you the coordinates of the centre and the radius for all of the circles detected in an image.
The OpenCV documentation gives an example of circle detection, so with a quick modification to keep track of a single circle’s path we get this:
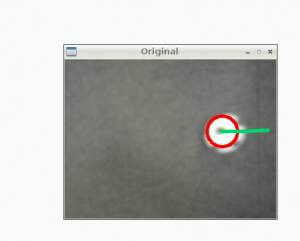
Ball and trajectory
Once we can detect when a ball has entered the field of view we need to add the goal line. We played around with line detection and bits of paper to represent the goal line but in the end decided that because of the limited PI processing power it would be more efficient to simply draw a fixed line on the image. This is shown as a orange line in the output video:
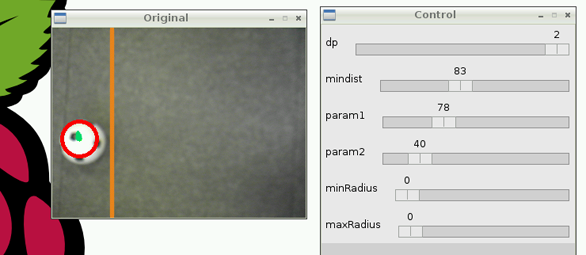
Ball with no goal
So now we need to detect when all of the ball is over our imaginary goal line. This is simple given that we know where the ball is and its radius and we have a fixed line. A bit of simple maths and we get:
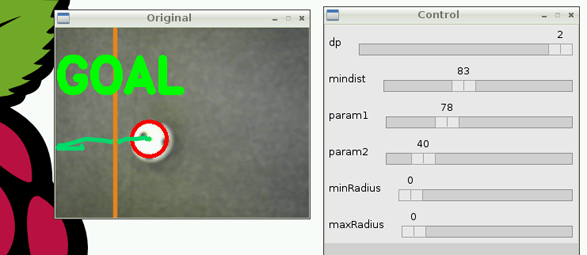
Goal!!!!!!!!!!!!!!!!!!!!!!!!!!!!!!!!!!!!!!!!!!!!!!!!
The full source code can be seen here:
[code lang=”c” title=”goal.cpp” collapse=”true”] #include <iostream>#include “opencv2/highgui/highgui.hpp”
#include “opencv2/imgproc/imgproc.hpp”
using namespace cv;
using namespace std;
//#define LINE_DETECTION
int main( int argc, char** argv )
{
VideoCapture cap(0); //capture the video from web cam
if ( !cap.isOpened() ) // if not success, exit program
{
cout << “Cannot open the web cam” << endl;
return -1;
}
// Set the screen size to 320×240
cap.set(CV_CAP_PROP_FRAME_WIDTH,320);
cap.set(CV_CAP_PROP_FRAME_HEIGHT,240);
namedWindow(“Control”, CV_WINDOW_AUTOSIZE); //create a window for tweaking the parameters
// Parameters for the Hough Transforms
// Circle detection
int dp = 2; // Inverse ratio of resolution (set to either 1 or 2)
int mindist = 83; // Minimum distance between detected centres
int param1 = 78; // Upper theshold for the internal canny edge detection
int param2 = 40; // Threshold for cetre detection
int minRadius = 0; // Minimum radius to be detected (leave at zero)
int maxRadius = 0; // Maximum radius to be detected (leave at zero)
#if LINE_DETECTION
// Line detection
int threshold = 27; // Minimum number of intersections for line detection
int lineLen = 0; // Min line length
int lineGap = 0; // Min line gap
int cannyThresh = 50; // Canny threshold for line detection preprocessing
#endif
// Create sliders for setting the values
cvCreateTrackbar(“dp”, “Control”, &dp, 2);
cvCreateTrackbar(“mindist”, “Control”, &mindist, 200);
cvCreateTrackbar(“param1”, “Control”, &param1, 255);
cvCreateTrackbar(“param2”, “Control”, &param2, 255);
cvCreateTrackbar(“minRadius”, “Control”, &minRadius, 100);
cvCreateTrackbar(“maxRadius”, “Control”, &maxRadius, 100);
#if LINE_DETECTION
cvCreateTrackbar(“Line Thresh”, “Control”, &threshold, 1000);
cvCreateTrackbar(“Canny Thresh”, “Control”, &cannyThresh, 200);
#endif
Mat imgOriginal; // Matrix for the original capture
Mat imgGrey; // Matrix for the Greyscale – used in the Circle detection
Mat imgCanny; // Matrix for the Cann – used in the Line detection
vector<CvPoint> trajectory; // Vector of points to track the bal trajectory
// Varoius control for clearing the trajectory and for goal detection
int idleCounter = 0;
bool goalDetected = false;
int goalCount = 0;
bool red = true;
int radius;
bool playTune = true;
while (true)
{
bool bSuccess = cap.read(imgOriginal); // read a new frame from video
if (!bSuccess) //if not success, break loop
{
cout << “Cannot read a frame from video stream” << endl;
break;
}
// Make a grey scale from the original as that has too much depth for image processing
cvtColor(imgOriginal, imgGrey, CV_BGR2GRAY);
// Circle detection needs some pre processing so add a bit od blur
GaussianBlur(imgGrey, imgGrey, Size(3,3), 2,2);
#if LINE_DETECTION
// Line detection needs a canny input so make that
Canny(imgGrey, imgCanny, cannyThresh, cannyThresh*3, 3);
#endif
// Detect circles
vector<Vec3f> circles; // A place to hold the detected circles
// The sliders allow a value of zero to be selected so just limit the minimum to 1 to be safe
if (dp == 0) dp =1;
if (mindist == 0) mindist =1;
if (param1 == 0) param1 = 1;
if (param2 == 0) param2 = 1;
// Do the circle detection
HoughCircles(imgGrey, circles, CV_HOUGH_GRADIENT, dp, mindist, param1, param2, minRadius, maxRadius);
size_t i = 0;
// Go round all the circles adding a small circle for the centres and a bigger
// one matching the detected radius.
for(i = 0; i < circles.size(); i++)
{
Point centre(cvRound(circles[i][0]), cvRound(circles[i][1]));
radius = cvRound(circles[i][2]);
circle(imgOriginal, centre, 3, Scalar(0,255,0), -1, 8,0);
circle(imgOriginal, centre, radius, Scalar(0,0,255), 3, 8,0);
}
// We only track when one circle is present
if (circles.size() == 1)
{
i = 0;
// Get the only circle detected
Point centre(cvRound(circles[i][0]), cvRound(circles[i][1]));
// Add it onto the trajectory vector
trajectory.push_back(centre);
// If we have too many points in the trajectory just clear it out as we cant see anything anyway
if(trajectory.size() > 30)
{
trajectory.erase(trajectory.begin());
}
}
// If there are no circles detected for 100 frames clear the trajectory
if(circles.size() == 0)
{
if(idleCounter++ > 100)
{
trajectory.clear();
idleCounter = 0;
}
}
// Draw the trajectory
if(trajectory.size() > 2)
{
for(int j=0; j < trajectory.size()-1; j++)
{
// Draw a line from the present point to the next
line(imgOriginal, trajectory[j], trajectory[j+1], Scalar(110,220,0), 3, CV_AA);
}
}
#if LINE_DETECTION
vector<Vec2f> detectedLines; // Create a vector for the lines to be held in
if (threshold == 0) threshold = 1; // Theshold cant be 0 just limit it
// Do the line detection
HoughLines(imgCanny, detectedLines, 1, CV_PI/180, threshold,lineLen,lineGap);
// We are looking for the end with the biggest x values – the line should be parallel
Point biggestX = Point(0,0);
// For all the lines detected
for(size_t k = 0; k < detectedLines.size(); k++)
{
// We get the end point and the angle from a normal Hough Line
// the predictive one gives endpoints but doesnt seem to work so well for this application
float rho = detectedLines[k][0], theta = detectedLines[k][1];
// A bit of trig to get the endpoints (taken from the opencv documentation)
Point pt1, pt2;
double a = cos(theta), b = sin(theta);
double x0 = a*rho, y0 = b*rho;
pt1.x = cvRound(x0 + 1000*(-b));
if(pt1.x > biggestX.x)
{
biggestX = pt1; // Found a bigger x coordinate
}
pt1.y = cvRound(y0 + 1000*(a));
pt2.x = cvRound(x0 – 1000*(-b));
if(pt2.x > biggestX.x)
{
biggestX = pt2; // Found a bigger x coordinate
}
pt2.y = cvRound(y0 – 1000*(a));
// Draw the line on the original image
line(imgOriginal, pt1, pt2, Scalar(28,134,238), 3, CV_AA);
}
#else // Just use location about halfway across
Point pt1 = Point(75,0);
Point pt2 = Point(75,300);
// Draw a line so we can tell where the goal should be
line(imgOriginal, pt1, pt2, Scalar(28,134,238), 3, CV_AA);
#endif // END Line detection
if(trajectory.size() > 0)
{
// If the ball plus the radius is further over the line
#if LINE_DETECTION
if(trajectory.back().x + radius > biggestX.x)
#else
if(trajectory.back().x + radius > 75) // about halfway across
#endif
{
goalDetected = true; // GOAL!!!!!!!
}
}
// Goal detection
if(goalDetected == true)
{
if(playTune == true)
{
system(“aplay /home/pi/goal2.wav &”); // Change for your favourite wav file
playTune = false;
}
if(red) // Alternate colours for that groovy feeling
{
putText(imgOriginal, “GOAL”, Point(0,80), FONT_HERSHEY_DUPLEX, 2, Scalar(0,0,255), 7);
red = false;
}
else
{
putText(imgOriginal, “GOAL”, Point(0,80), FONT_HERSHEY_DUPLEX , 2, Scalar(0,255,0), 7);
red = true;
}
if(goalCount++ > 50) // After 50 frames we probably have had enough
{
goalDetected = false;
goalCount = 0;
playTune = true;
}
}
//show the original image
imshow(“Original”, imgOriginal);
if (waitKey(25) == 27) //wait for ‘esc’ key press for 30ms. If ‘esc’ key is pressed, break loop
{
cout << “esc key is pressed by user” << endl;
break;
}
}
return 0;
}
In our version of Wembley we lined up the orange line by sight with the blue cross bar of our goal, set up the cameras (trusty iPhones) and gave it a test run which can be seen in the video below.
Conclusion
Although as we said above we are not expecting a knock on the door from FIFA any time soon. Using OpenCV and relatively little code we managed to knock up something that detects when a football crosses a goal line. It would obviously need lots more work to take into account players heads and other image artifacts before being usable.
Unfortunately we came to the conclusion that a single Pi is just not up to the job. Perhaps if we have any spare time we can create a distributed solution with a cluster of Pi’s! We could also make use of a Kinect camera and have a play around with the freenect library.